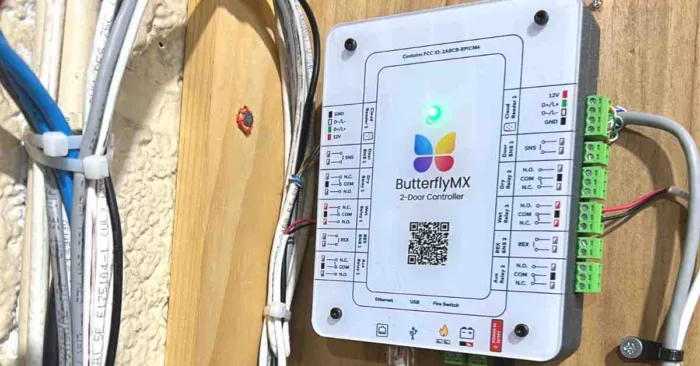
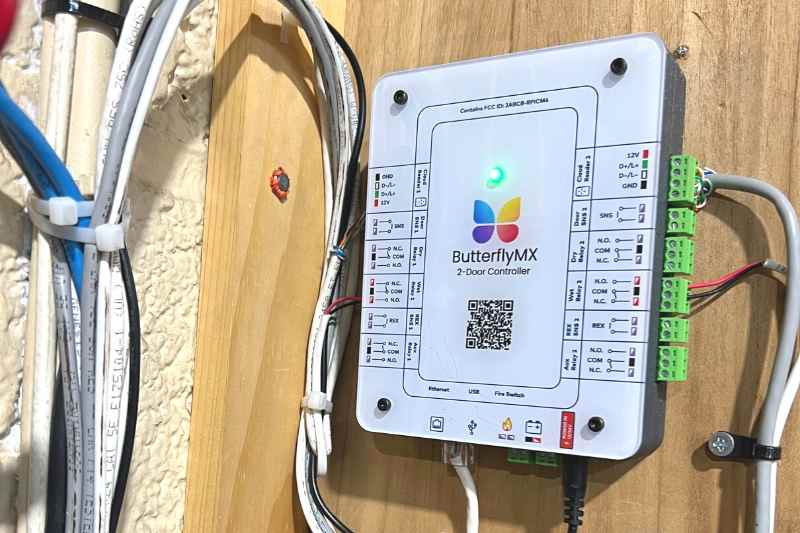
The ButterflyMX 2-door access controller serves as the brain of the access control system. It pairs effortlessly with the vehicle readers, keypads, and mullion readers to enable your clients to effortlessly operate and manage doors and gates using their smartphone, fob, keycard, or PIN code. These solutions seamlessly integrate with your video intercom, elevator controls, and smart locks, offering a unified access solution.
Read this post to begin the ButterflyMX access control installation and install your client’s 2-door access controller.
Follow these instructions to install the 2-door controller:
- Mount the controller
- Connect the controller to the internet
- Connect the controller to power
- Connect the controller to electronic locking hardware
Mount the controller
To begin the process of installing the 2-door controller you’ll first need to securely mount the controller to the wall.
Follow these 2 steps to mount the 2-door controller:
Step 1: Secure the DIN rail

Utilize the screws provided to secure the DIN rail in place.
Step 2: Attach the controller
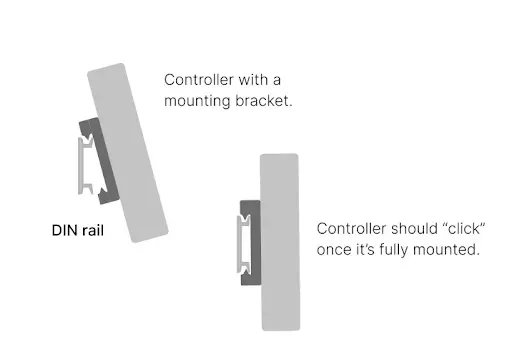
Next, attach the controller to the DIN rail using the included mounting bracket. The controller should “click” once it’s fully mounted.
Connect the controller to the internet
Next, connect the controller to the internet.
Important note: The controller can be connected to the internet using Ethernet or WiFi. However, Ethernet is the preferred option when possible.
There are two options when connecting the controller to the internet:
How to connect the controller via Ethernet

Plug the Ethernet cable into the controller’s Ethernet port.
How to connect the controller via WiFi
Download and register for the ButterflyMX Installer App and follow the prompts to connect the controller to WiFi. If you are unable to download the app, please contact ButterflyMX support.
Connect the controller to the power
At this point in the installation process, you are ready to connect the controller to power.
Follow these two steps to connect the controller to power:
Step 1: Connect the power supply
First, connect the controller to the power supply and wait for 45-60 seconds. During this time, observe the white LED on the front center of the controller. This LED serves as an indicator of the power connection. If the LED does not illuminate, it indicates that the controller is not receiving power.
Step 2: Verify the panel is online
After being connected to the power supply, the controller’s light will be white to indicate a successful power and internet connection. You can also confirm the panel’s online status and connection via the installer app. If the controller’s light appears red, it signifies that it is not connected to the internet.
Join ButterflyMX’s industry-leading dealer program:
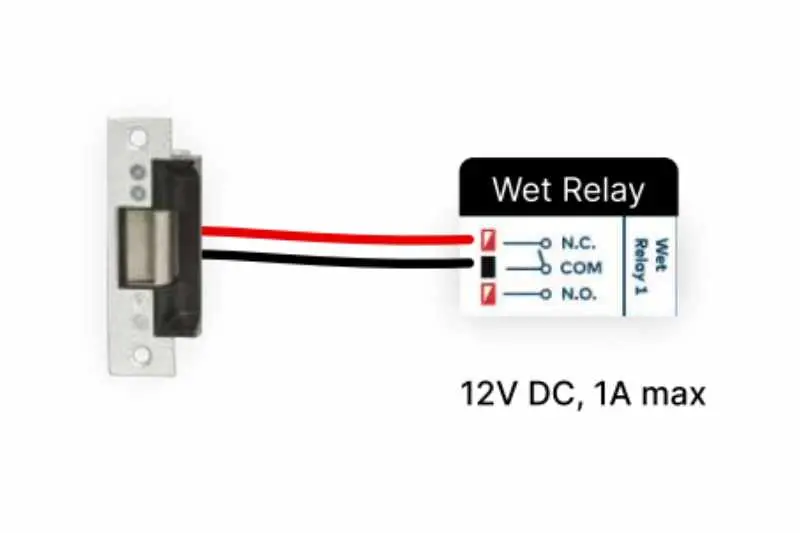
Connect to electronic locking hardware
Last, connect the controller to the electronic locking hardware.
How to connect the 2-door controller to electronic locking hardware:
- Determine if the lock is fail-safe or fail-secure
- Connect to the electronic locking hardware
- Connect to a Maglock
Determine if the lock is fail-safe or fail-secure
Before installing the electric locking hardware, check the manufacturer’s documentation to set the mode of operation. Electric locking hardware operating in a fail-safe mode will automatically switch to an unlocked state in the event of a power loss. This implies that the locking hardware will stay unlocked until power is reinstated. Fail-safe locks might be necessary to meet specific codes and Life Safety requirements.
On the other hand, electric locking hardware in a fail-secure mode will default to a locked state if the system experiences a power failure. Fail-secure electric locking hardware may need an additional physical means of exit, such as a crash bar or a mechanical free-egress mechanism.
How to connect the controller to electronic locking hardware
When connecting electronic locking hardware to the controller, it is important to identify the appropriate side of the controller to connect to. For single-door installations, always use Side 1 for all connections. Make sure to attach the wires to the correct terminals, namely N.O. (Normally Open) and COM (Common). On Side 1, N.O. will be positioned below COM, while on Side 2, it will be above COM.
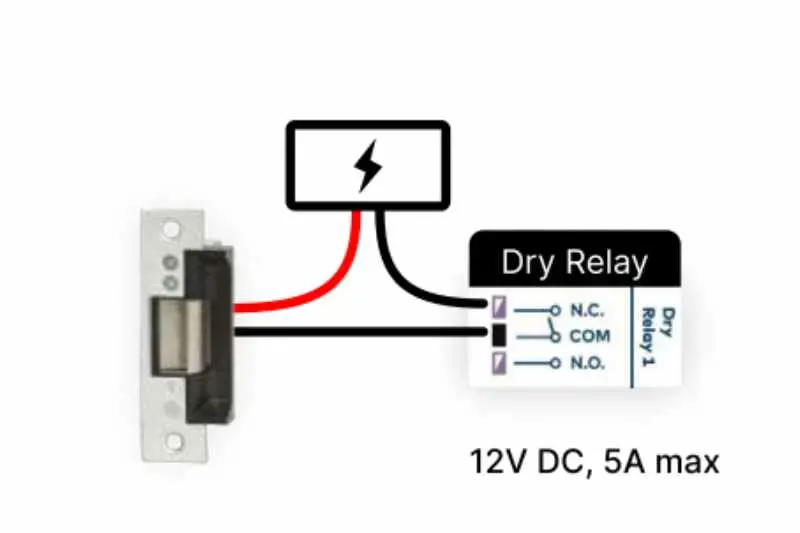
Fail-safe
Electric locking hardware (fail-safe) powered by the controller.
Electric locking hardware (fail-safe) powered by an external power supply.
Fail-secure
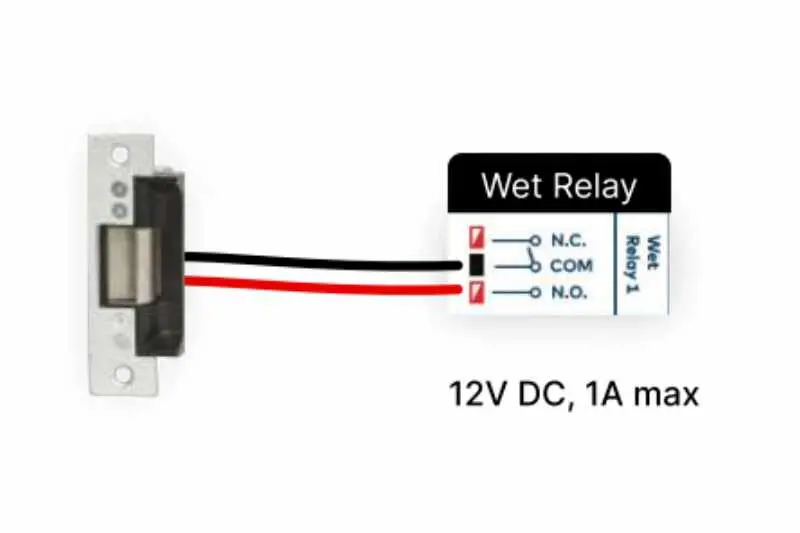
Electric locking hardware (fail-secure) powered by the controller.
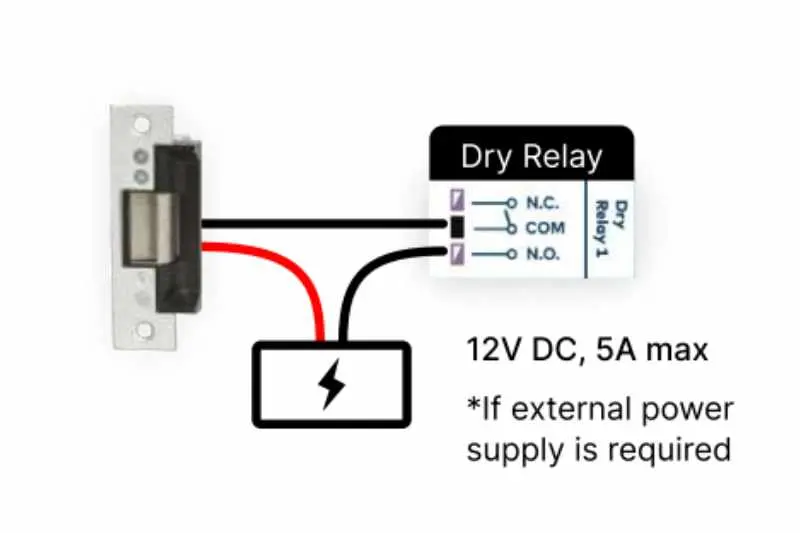
Electric locking hardware (fail-secure) powered by an external power supply. The external power supply must be 12VDC, 5A max.
How to connect to a magnetic lock
Alternatively, your clients may prefer to connect to a magnetic lock. Before getting started, ensure that you identify the appropriate side of the controller to connect the magnetic lock. For single-door installations, it is essential to use Side 1 for all connections. Make sure to connect the wires to the correct terminals, namely N.C. (Normally Closed) and COM (Common). On Side 1, the N.C. terminal will be positioned above COM, while on Side 2, it will be located below COM.
When connecting the magnetic lock, set it to fail-safe mode and connect it to N.C. and COM (Normally Closed and Common). Prior to installing the magnetic lock, refer to the manufacturer’s documentation to correctly set the mode of operation.
Fail-safe
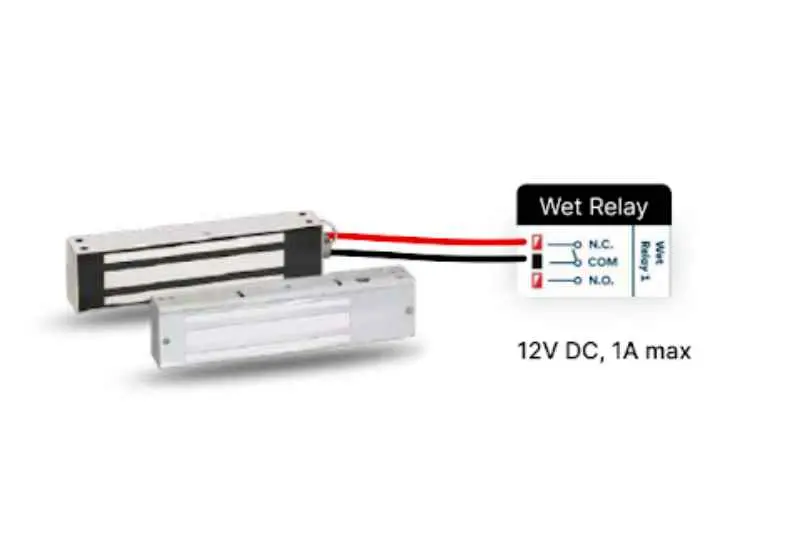
Magnetic lock (fail-safe) powered by the controller
Magnetic lock (fail-safe) powered by an external power supply, if required.
For more information on installing ButterflyMX products, visit our installer resources page.