
Key takeaways
- You can easily add, remove, or update tenant information manually or through integration with your property management software.
- Admins can adjust tenant display names, set activation dates, and control directory visibility to meet resident preferences.
- Residents receive unique entry options, including Door PINs for backup access, ensuring convenience and security.
As a ButterflyMX property admin, you can manage your tenant list by adding, removing, or updating tenant data at any time.
By integrating your property management software (PMS) such as Entrata, ReaPage, Yardi, or RentManager, you can automate resident management by automatically syncing resident data with your ButterflyMX intercom. However, if you haven’t integrated ButterflyMX with your property management system, you can add tenants manually. In this post, we walk you through how to manually add tenants.
How to manually add tenants to your ButterflyMX system:
- Log in to the ButterflyMX OS
- Click ‘Tenants’ from the left-hand menu
- Click the ‘Add Tenant’ button
- Enter the tenant’s information
- Adjust settings as needed
Step 1: Log in to the ButterflyMX OS
First, log in to the ButterflyMX OS on a computer.
Step 2: Click ‘Tenants’ from the left-hand menu
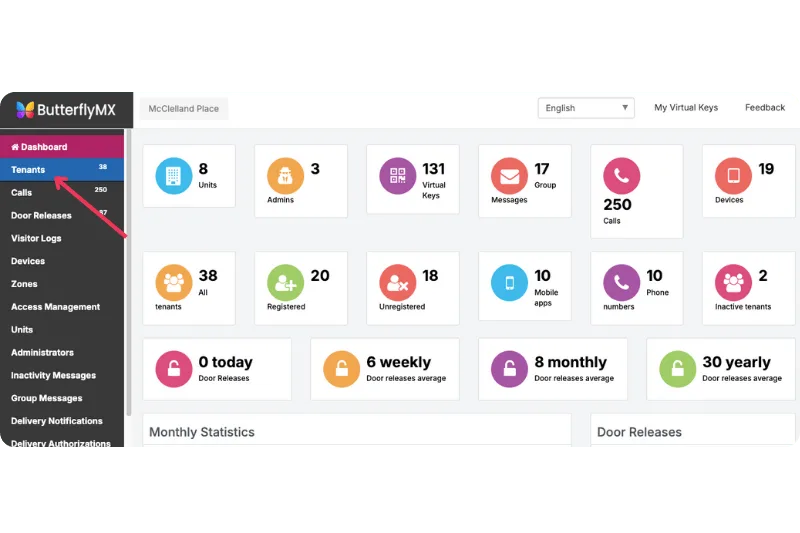
Then, navigate to the menu on the left-hand side of the page and click ‘Tenants’.
Step 3: Click the ‘Add Tenant’ button

Once in the ‘Tenant’ section, click ‘Add Tenant’ on the top left of the page.
Step 4: Enter the tenant’s information
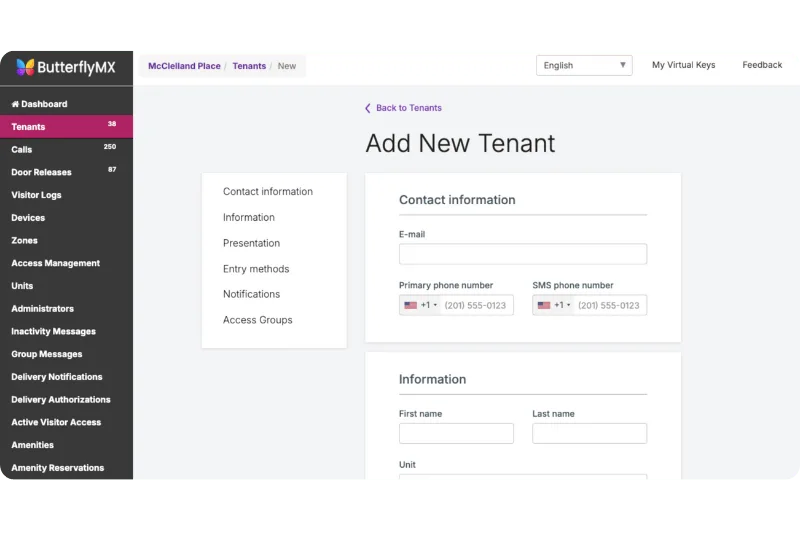
You will then fill in basic information including the tenant’s email address, first name, last name, phone number, and unit. While it’s important that all information is accurate, their email address must be correct, as we need this to send the tenant a registration email so they can begin using the system.
Step 5: Adjust settings as needed
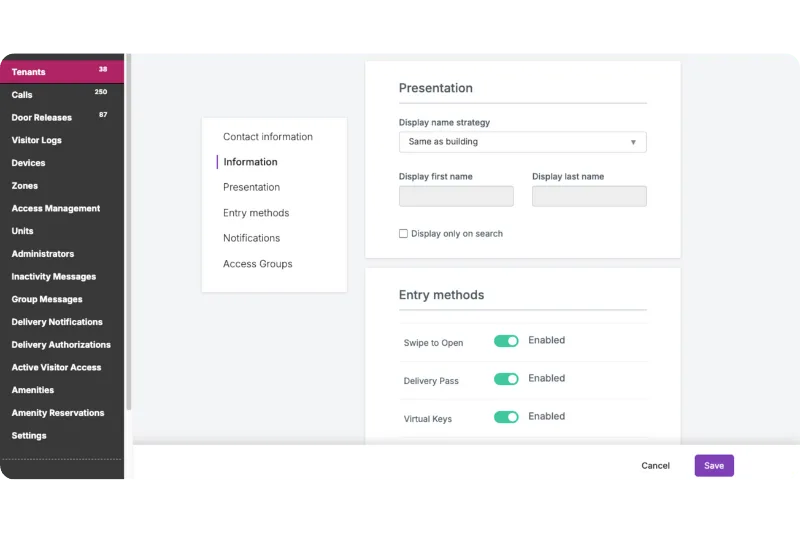
In the ‘Information’ section, you can choose the activation date for the tenant in the system. this allows you to activate their name on a future date if they are not moving in immediately.
In the ‘Presentation’ section, you can set the display name strategy for the tenant. The display name strategy determines how tenants’ names appear in the intercom directory. Newly added tenants will have their display name set to the building’s default setting. If a tenant prefers a different display name, you can manually type in what they’d like displayed.
You also have the option to enable ‘Display only on search’, ensuring the tenant will only appear in the directory when specifically searched for.
Under ‘Entry methods’ you can see that any entry method enabled on the building level will also be automatically enabled for the tenant. If Door PINs are enabled, the system will automatically generate a four-digit PIN for that tenant once you hit ‘Save’. This PIN can be used to gain access to the building if, for example, their phone has died. The tenant can change this PIN at any time in the mobile app.
