Key Takeaways
- The access control installation process involves several key steps, including designing the system, running wiring, installing hardware, configuring the system, and testing.
- Before choosing an access control system, consider your security needs, budget, preferred credentials, and whether you prefer a cloud-based or on-premise system.
- The best way to find an access control installer is to contact the manufacturer of the system you’re interested in for a certified professional.

It’s essential to have the right professional handle your access control system installation. These systems are complex, requiring the right experience for a successful installation. Otherwise, your system may not work as intended — and you could even end up voiding your warranty.
Therefore, we cover how to find the right installer for your system and walk you through the access control installation process. Additionally, you’ll find a free access control installation checklist we created and answers to some commonly asked questions.
This post covers:
10-step access control installation guide
Knowing the access control installation process can help you better prepare for the day of installation. However, the installation process will vary depending on the type of system you choose.
With that said, the step-by-step guide below is generally how the access control installation process would go.
Important note: We recommend you hire a professional access control installer or integrator to install your system. They have the knowledge, expertise, and certifications to give you a better overall experience.
So, here are the 10 steps to installing an access control system:
- Design and plan the installation
- Run wiring
- Install electric door locks
- Wire door locks to the controller
- Install the readers
- Wire the readers to the controller
- Configure the system
- Inspect and test
- Onboard users
- Test again

1. Design and plan the installation
Start by closely inspecting your property to create an installation action plan and ensure your building’s infrastructure can accommodate your system of choice. Planning is essential for mitigating problems during the installation phase and helping identify potential challenges your property may present during a door access control installation.
Furthermore, before installing your system, it’s important to comply with all relevant regulations and building codes. These requirements are designed to ensure the safety and security of building occupants, and they can vary based on your location and industry. To avoid potential fines or delays, research municipal building codes and any industry-specific regulations (e.g., HIPAA, OSHA) before starting the project.
2. Run wiring
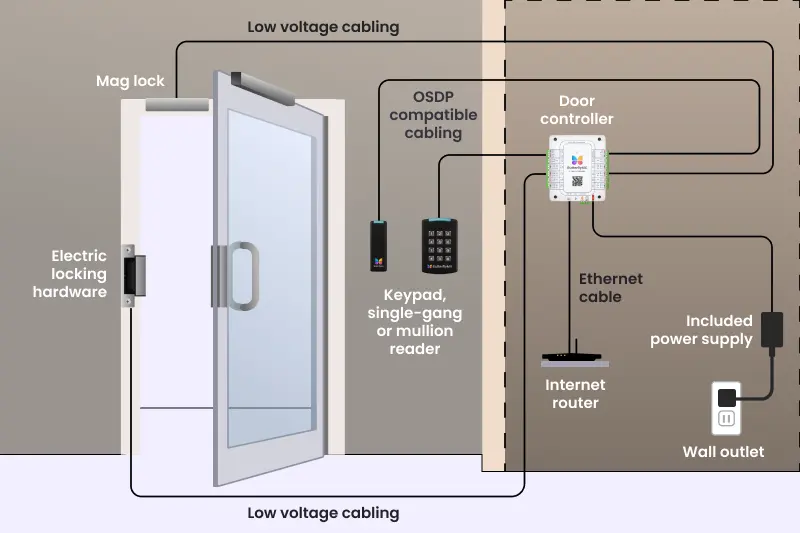
Next, run the appropriate wiring — Ethernet and low-voltage cables — from the electrical locks and readers to the access controller. This process may take a while, depending on the installation’s complexity and the property’s size. During this phase, it’s best to closely follow the access control wiring diagram PDF provided by the system’s manufacturer.
3. Install electric door locks
Then, install the electric door locks, ensuring they are properly aligned with the door frames. Depending on the types of doors you’re installing the locks on, you may need different sizes to fit specific doors.
4. Wire door locks to the controller
Once the electric door locks are installed, wire them directly to the access controller, which acts as the system’s “brains.” Upon receiving a credential, the controller verifies that the user has permission to enter the designated area before prompting the lock to release.
5. Install the readers
After the electric strikes are installed, begin installing the access control readers or keypads according to the manufacturer’s access control installation diagram. Depending on the installation, you may install these devices on the door frame or next to it on the wall.
6. Wire the readers to the controller
The final wiring portion of the installation involves connecting the readers to the access controller. After finishing the wiring from the readers and locks, finish off the controller wiring by connecting it to the internet router via Ethernet and a power supply.
7. Configure the system
After wiring, configure the software and connect it to the internet if using a cloud-based system. At this time, you can also set up the initial admin accounts for testing purposes.
8. Inspect and test
Throughout the installation process, you should perform inspections and tests. However, a comprehensive inspection and test can’t be completed until all the hardware is installed.
So, use valid and invalid credentials to test readers and door functionality. At the same time, inspect every aspect of the system for errors or malfunctions. If problems occur, address them immediately for a smoother onboarding process. Fixes may involve software calibrations or even hardware adjustments.
9. Onboard users
Now, you can start onboarding new users by showing them how to use the system, including both the hardware and software. Training administrators on the system is essential for preventing future challenges for users.
Walk management through the user interface so you can add or remove tenants and edit access permissions. Once you are more familiar with the access control system, you can adjust several other settings.
Afterward, you can start onboarding other staff members who need to manage the system.
10. Test again
Finally, it’s vital you test the system again to ensure everything is working as expected, especially as you onboard more users. The final round of testing will ensure you are confident in the operation of your access control system.
Free access control installation checklist
We’ve created a free checklist to help you stay on track with your access control installation, regardless of whether you’re an installer, property manager, or owner.
What to consider before an access control installation
When deciding to install an access control system, there is a lot to consider, such as:
- Property needs. Identify the internal and external security risks you wish to protect against. Also, consider the number of entryways you’d like to control. Answering these questions will help you determine the security needs your access control system should address.
- Wired or wireless. Access control systems can be wired or wireless, each with its own pros and cons. Wired access control systems can cost more to install in existing buildings but won’t run into connectivity issues as often. Wireless access control systems, also known as cloud-based systems, are better options for existing buildings because they’re generally cheaper and easier to install.
- Type of credential. There are many different types of credentials an access control system may use: key card, fob, PIN code, mobile phone, and biometric scan. Of these options, it’s up to you to decide what you want. Ideally, choosing an access control system that accepts multiple credentials is best. For example, a tenant may use their mobile phone to unlock the building entrance if they’ve lost their fob.
- Costs. Finally, as with all purchases, the cost is a major factor to consider. Of course, the most obvious are the upfront costs like hardware and labor. But you should also consider the ongoing costs after installation. Your access control system may have a subscription fee after launch for any software it utilizes. Further, some newer or less robust systems will require regular maintenance. So, while you pay less upfront, you’ll wind up paying more in the long run. This is why we recommend you go with a highly reputable, established option like ButterflyMX.
Learn more about ButterflyMX:
How to find an access control installer
The most effective way to find an installer for your access control is to contact the system’s manufacturer for a certified installer. Certified professionals are educated and trained by the manufacturer to install the system correctly, ensuring you receive the best possible product.
Without a certified installer, you risk experiencing an inefficient access control system because of a faulty installation. Not to mention, you will likely forfeit the system’s warranty. So, choose a certified installer for the best installation possible.
Conversely, if you are unsure of the system you want, reach out to several installers in your area for an estimate and to learn more about their access control installation services. They’ll inspect your property and provide product recommendations based on your security needs and budget.
Above all, choose a certified installer for the system you want to benefit from:
- Proper installation following the manufacturer’s guidelines.
- Faster installation process because the installer knows what they’re doing.
- Intact product warranty from the manufacturer.
Access control system installation FAQs
- How long does it take to set up access control on a door?
- How long does it take to install an access control system?
- Where must access control systems be installed?
- How much does it cost to install access control?
How long does it take to set up access control on a door?
Installation of a door access control system can take between two and five hours. This is highly dependent on the hardware and whether it’s wired or wireless.
After that, you’ll also need to spend time setting up the software and filling out the database to include each tenant that will need access.
How long does it take to install an access control system?
It depends on the complexity of the system and the size of the property. Smaller systems with a few entry points may only take a day or two. Meanwhile, larger, more complex access control installations will take several days or a week to complete. The building’s infrastructure and possible custom configurations may also impact the installation time.
Where must access control systems be installed?
Access control systems are typically installed at main entryways and exits where you want to manage and monitor access. Examples include lobby doors, employee-only areas, server rooms, and offices.
Of course, access control systems can be installed at other types of entry points too, such as gates, elevators, and package rooms. The place in which you install an access control system will depend on your security needs.
How much does it cost to install access control?
On average, you can expect to pay anywhere from $1,500 to more than $5,000 per door. Nonetheless, the cost of access control installation depends on multiple factors, including the number of entryways, the type of system, and the complexity of the project.


